Well, this will be post 44 for the year, and my goal earlier in December was to meet or exceed the 45 done for last year.
One short.
The longest yard.
Missed it by that much.
Gave it the old college try.
Guess that means I didn't meet my goals and my performance evaluation will have to have that noted.
Or - yeeeeeehawwwwww! Close enough!!!
Anyway, I've enjoyed the blur of posts, and it has put me into more of a rhythm for posting. I'll try to keep that up in 2012.
Speaking of 2012...
I for one am thrilled to see 2011 in the rear view mirror. 2011 was filled with health and accident issues that dominated the year. Being an even year, 2012 will undoubedtly be much better.
So, to end on an historical note, I usually try to listen to something while I paint. Music, documentaries, podcasts, etc. One of the best sources is the Pritzker Military Library. There is an amazing library of archived presentations from noted (and not so noted) military historians on the site. Check 'em out and enjoy.
http://www.pritzkermilitarylibrary.org/home/default.aspx
See all y'all next year.
Brent
Saturday, December 31, 2011
Bases - Black
The photos show the bases at the next stage - thinned black paint on the larger rocks and rough areas. After this dries, next stage is drybrushing a dark gray, then a lighter mid gray, and finally a light gray.


Basing - Next Stage - Drybrushing
The photos below show the bases with the two shades of lighter brown tones drybrushed onto the bases. Total time to do was about 1 hour. Next up is applying thinned black paint to larger rock areas and rough ballast areas, applied in a somewhat random pattern on the bases.


Friday, December 30, 2011
Basing - Stage 2
Progress being made on basing the French, Spanish, and Brits. The photo shows the current stage - the sand/ballast mixture is glued on, dried, then painted (Anita's Earth Brown). The edges of the stands are now painted as well. Next up is highlighting (drybrushing) the bases (Americana Mississippi followed by Driftwood).

More to follow!

More to follow!
Thursday, December 29, 2011
Catching up on Basing
Well, since the week before Thanksgiving, I've painted or finished 12 infantry battalions and 1 artillery battery for my Napoleonic collection, an officer stand, as well as rebasing all of my ancients and medieval figures, plus basing 3 Soviet WW2 infantry companies. That means finishing up stands on 39 units! I was in a groove with the painting, so didn't want to distract that progress with finishing the bases. Next up is getting cracking on the bases.
Here's 2/3 of the Napoleonic stuff, waiting for basing beauty.
 Updates to follow as I work through this mountain of basing....
Here's 2/3 of the Napoleonic stuff, waiting for basing beauty.

Tuesday, December 27, 2011
Cheaters!
I speak of "cheaters" for my eyes, and not wargame cheaters!
If you're like me (older than I care to admit, out of the target demographic, younger than old.....), you have reached or will reach the point where you're having problems picking up details on figures when you're painting them. I do wear glasses or contacts, but don't need them for up close details. However, this past summer I noticed that I was getting irritated painting, which was odd - I enjoy painting.
So - refusing to acknowledge time, I elected to forgo bifocals, and instead head to my trusty neighborhood pharmacy/convenience store (Walgreens!). I went to the el cheapo magnifying eyeglass section, and experimented with different strengths until I found one that clearly focused on my hands with them held at my usual painting distance from my eyes.
The result?
BINGO! Complete success!! All the details were instantly completely visible again, and my painting time was fun again.
I asked my eye doctor if the above was an acceptable solution to him - he said "absolutely!" - no long term issues or effects on my eyes.
It can be a bit irritating if something catches my attention on the TV, etc, but I've perfected looking over the top of the lenses with the stern appearance of a 3rd grade teacher eyeing undesirable student behavior....
Here's a shot of the eyeglasses. Stylish? Not really....but a great solution for around $15.

Thursday, December 22, 2011
Highland Infantry
Some shots of the Highland infantry unit, basing yet to be completed.

 Working away on French infantry now. The total count, since my first vacation days before Thanksgiving, including some focused weekend/night work, and time in December is:
3 Spanish infantry battalions
1 Spanish General
95th Rifles
42nd Highland
1 British light infantry regiment
1 French light infantry battalion
3 French line infantry battalions
All ancient figures rebased, base finishing remains. This includes painting some extra figures to bring units up to 12 foot/8 cav per unit.
Whew! I need to make hay while the sun shines. January is already shaping up to be a very busy work month, so I doubt I'll get too much done then.
Sunday, December 18, 2011
British Light Infantry - Painting Completed
I finished up another British unit for my Penninsular collection - a light infantry regiment. I still need to finish bases and flags for the units I've completed, but first I think I'll get some French infantry finished off to help even up the two sides.

 A short post for now. Hopefully, I'll feel inspired after a Broncos win over the Patriots to do another post tonight. (He says with more than a bit of doubt about the Broncos in this upcoming game....).


Tuesday, December 13, 2011
Work in Progress!
So - I'm taking some days off this week, and being home alone gives me uninterrupted painting time! Well...uninterrupted except by demands from Captain Toby, Jack Russell patrol dog.
I'm making a push to add some unique units to my Penninsular war collection. So far this week I've finished painting a French light infantry unit, the 95th Rifles, and am plugging away on a Highlander unit. Not sure what will come next - possibly a British light infantry unit, possibly more French line. I'd like to add some of the minor states allied to the French, but I haven't done the research yet on uniforms/nationalities/flags for them.
Here are some WIP shots:

Sunday, December 11, 2011
Marion Barber - Denver Broncos MVP
This is one of those "and Stuff" posts on the old blog.
Wow. I don't really believe what I keep seeing with Tim Tebow quarterbacking the Denver Broncos. I've never seen a player with his poise in the 4th quarter. Its like a calm settles over him and the game slows down. Too bad that he plays so average to below average in the 1st 3 quarters! He goes something like 3 for 16 for 50 yards in the first 3 quarters, and then goes 15 for 20 for 175 yards in the fourth quarter. HUH??
Of course, Tebow will get the acclaim, but the credit for the win should really go to the Bears' Marion Barber, Bronco MVP, Bears Goat. Let's see - if he just runs stays in bounds on the Bears last possession in the 4th quarter, the clock runs out and the Broncos and Tebow don't even get the ball back to have a chance to tie the game. Nope...Marion Barbergoat breaks free and runs out of bounds.
Bonehead.
Overtime. Marion Barbergoat appears to break free but isn't aware of ball security and has the ball stripped.
Bonehead.
Broncos march down the field, kick a field goal and move to 8-5.
There is a LOT to be said for poise, character, and football IQ in the NFL. Tim Tebow has it. Marion Barber....well.....THANKS MARION!!!! Denver loves you!!!!!!
Town Section Planning
I'm starting work on finishing off some town sections. The town sections will be for multi-period use, and will be used to abstract unit placement inside them. Essentially, units will only have the best deployment for firing out of a town section on a limited number of sides of the town section. The arrangement of the town section (buildings on the base) will determine the available space which will define how units can face, as well as how many can be placed in the section.
Some photos from planning:
 This photo shows the base (6" square) and the "building" prior to detail and assembly.
 An example of placing the building to one edge, allowing units to face 3 edges.
 Oriented differently; now only 2 edges of the town section are "good" for defending units.
 Only two good edges, plus a tree added to the section. I'm definitely adding foliage to each section; looks much less industrial!
I'll be adding walls along edges, and detailing the building as the section is finished. More photos in upcoming posts.
Some photos from planning:


I'll be adding walls along edges, and detailing the building as the section is finished. More photos in upcoming posts.
Saturday, December 3, 2011
Pulse of Battle Basing!
After messing around with the large single stand units, I was not satisfied with the feel. For one, I noticed bent swords and loosened spears just from simple stand movements. The weight of the single stand unit seemed to create more damage from handling than from handling multiple stands per unit.
So - inspired by James Roach's blog post on basing for his Italian Wars collection, I started playing around with base sizes. I decided that I wanted all foot units to have 12 figures, and all cavalry units to have 8 figures - regardless of their weight (light, medium, heavy).
Using James' original inspiration, I started messing with base depth to differentiate by weight, which allows units to have the same frontage.
While equal frontage is not a requirement in game terms, it sure makes things easy....and if I'm about anything, I'm about easy!
So - my base sizes for PoB are:
Light Infantry: 1.5" wide, 2 1/2 " deep
Medium Infantry: 1.5" wide, 2" deep
Heavy Infantry: 1.5" wide, 1.5" deep
Light Cavalry: 1.5" wide, 3.5" deep
Medium Cavalry: 1.5" wide, 3" deep
Heavy Cavalry: 1.5" wide, 2.5" deep
Elephant: 1.5" wide, 3" deep.
The base terraining isn't completed yet, but the following pictures show the effect. I like being able to differentiate unit weight quickly by just noting the depth of the unit. To me, this makes sense, as lighter units would expand "sponge like", in depth and not necessarily width. After all, in an era where voice and visual sighting limitations would be the determining factor on how large a unit could be and still be commanded, it makes sense to me that frontages for x number of men would be somewhat equal, with lighter troops expanding deeper to looser deployments - but the cloud remaining "close" to the leader.


 The 4 stand units will also let me show disorder easily (jumble the stands) and also mark losses (remove a single stand and replace with the appropriate level of UI loss stand).
I need to get to work on painting more troops, and finishing bases!
So - inspired by James Roach's blog post on basing for his Italian Wars collection, I started playing around with base sizes. I decided that I wanted all foot units to have 12 figures, and all cavalry units to have 8 figures - regardless of their weight (light, medium, heavy).
Using James' original inspiration, I started messing with base depth to differentiate by weight, which allows units to have the same frontage.
While equal frontage is not a requirement in game terms, it sure makes things easy....and if I'm about anything, I'm about easy!
So - my base sizes for PoB are:
Light Infantry: 1.5" wide, 2 1/2 " deep
Medium Infantry: 1.5" wide, 2" deep
Heavy Infantry: 1.5" wide, 1.5" deep
Light Cavalry: 1.5" wide, 3.5" deep
Medium Cavalry: 1.5" wide, 3" deep
Heavy Cavalry: 1.5" wide, 2.5" deep
Elephant: 1.5" wide, 3" deep.
The base terraining isn't completed yet, but the following pictures show the effect. I like being able to differentiate unit weight quickly by just noting the depth of the unit. To me, this makes sense, as lighter units would expand "sponge like", in depth and not necessarily width. After all, in an era where voice and visual sighting limitations would be the determining factor on how large a unit could be and still be commanded, it makes sense to me that frontages for x number of men would be somewhat equal, with lighter troops expanding deeper to looser deployments - but the cloud remaining "close" to the leader.


I need to get to work on painting more troops, and finishing bases!
Friday, December 2, 2011
Building Section
I've experimented with a new town/building section system. Previously, I used a space occupied by multiple unattached buildings. Worked well functionally, but not necessarily the best looking solution.
My new system uses a base with a building/buildings permanently attached and landscaped. The open base space is only enough to allow a set number of stands or units to be in the town area.
Here's the test section:
 The open area to the front is 1.5" x 3" - the same size as my infantry stands for my WW2 rules. You can see the old town section built into the terrain tiles in the left rear of the photo.
 Here's the area with a Soviet infantry squad (or company, depending on the rules) deployed. Note that the squad will be able to fire at only a minor downward modifier firing in this direction - the only direction they can be deployed. Units must be deployed facing an edge of the area. In my WW2 rules, firing to the flank/rear is an additional negative modifier. So - a pretty good defensive position if attached from this direction, not so good from the other directions.
More photos:

 The building is knocked together with some solid wood pieces, cut to length/angle with a power mitre box, and some macrame (spelling??) grid for windows. The roof/shingles is from mdf with the pattern pressed on one side. Works great for mimicking a shingle effect, and the resulting roof is tough and gamer proof.
My personal goal for the remainder of 2011 is to end with more posts than in 2010. I'll need to knock out quite a few over the next month, averaging more than 1 per 2 days. Hmmmm....a challenge!
My new system uses a base with a building/buildings permanently attached and landscaped. The open base space is only enough to allow a set number of stands or units to be in the town area.
Here's the test section:


More photos:


My personal goal for the remainder of 2011 is to end with more posts than in 2010. I'll need to knock out quite a few over the next month, averaging more than 1 per 2 days. Hmmmm....a challenge!
Tme Scale
I was reading a boardgame newsgroup discussion of a WW2 air game the other day. Each game turn represented 4 seconds of real time. Not 5 seconds or 10 seconds.....exactly 4 seconds. Typical playing time for the game, as quoted by the author "3 to 4 hours". Uh......really????
So - let's say you get through, being generous, 20 turns. That's 80 seconds of scale time....a lifetime in air combat. You play 80 seconds of scale time in 3 hours.
To me, that is the height of absurdity! In a combat situation requiring snap judgements and intuition, this game (as many air games) instead turns into an over analyzed chess match.
One poster had mentioned that he played the game via email....and he played 1 game that lasted 11 MONTHS.
Oh my.
I can tell that what I want in an air combat game must not fit at all with what the gaming community wants. I've played around with some ideas, but they all center on rapid decisions, boom boom boom activities and at most a "dogfight" is over in 5 minutes. But - that 5 minutes is full of decisions and reactions, not beard stroking and analysis.
I'm currently 60% through rebasing my ancients, as well as finishing up a house section for my tabletop. Finished up 3 battalions of Spanish for my Pennisular collection using the new style I'm adopting to speed my painting. I finished 36 figures in about 16 hours of work. Pretty fast to me; still have to finish off the bases. Here's a photo of a stand right now:

 And a gratuitous photo from a past WW2 game, just because I like it.
So - let's say you get through, being generous, 20 turns. That's 80 seconds of scale time....a lifetime in air combat. You play 80 seconds of scale time in 3 hours.
To me, that is the height of absurdity! In a combat situation requiring snap judgements and intuition, this game (as many air games) instead turns into an over analyzed chess match.
One poster had mentioned that he played the game via email....and he played 1 game that lasted 11 MONTHS.
Oh my.
I can tell that what I want in an air combat game must not fit at all with what the gaming community wants. I've played around with some ideas, but they all center on rapid decisions, boom boom boom activities and at most a "dogfight" is over in 5 minutes. But - that 5 minutes is full of decisions and reactions, not beard stroking and analysis.
I'm currently 60% through rebasing my ancients, as well as finishing up a house section for my tabletop. Finished up 3 battalions of Spanish for my Pennisular collection using the new style I'm adopting to speed my painting. I finished 36 figures in about 16 hours of work. Pretty fast to me; still have to finish off the bases. Here's a photo of a stand right now:


Sunday, November 27, 2011
Cards in Wargames
It is with a mixed sense of interest and frustration that I note all the new miniature and board games using cards to control turn sequences and/or events.
What's old is new again...
I've long used cards in my games. Many, many years ago, I subscribed to the "PW Review", a mimeographed 8 1/2 x 11 stapled monthly newsletter that featured the ramblings of Wally Simon. Wally used cards for sequence management and action allocation, and I can't remember many of his homegrown rules that didn't use them.
I tinkered with The Sword and the Flame for a while - it had cards, after all! I could never force myself to like the red/black one unit at a time activiation. Too slow for my tastes, and it left most players to sit and watch.
Many moons ago - 12? 15? I can't even remember - Bob Jones moved back to Denver in a career move. I'm not sure how many out there know or have met Bob, but he NEVER thinks conventionally. Bob has to be one of the most creative thinkers and game designers to have ever have graced the wargame hobby. When I met Bob, he was just starting to tinker with concepts that would turn into Piquet, and the associated period supplements. Many years of debate followed, as control enthusiasts decried the randomness of Piquet and its turn sequencing using cards. "Too random!" "No control!" "It will never work!".
Well - work it did! Bob has since moved on to different methods of creative turn sequencing and action limitations in his Die Fighting and Zouave rules, and I've written the Field of Battle series of games, which had their genesis in Piquet.
I've never thought that Bob has ever received enough acclaim or recognition for his original and unique game designs.
Maybe imitation is the sincerest form of flattery? I now note that many new sets use cards (gasp!) - the new set by Sam Mustafa (another great designer) uses cards for turn sequencing; multiple boardgames use cards for events; even the new series of boardgames for Victory Point Games by Frank Chadwich appear to be using cards.
Anyway - having lived through the criticism of cards as a game mechanic, its interesting to note that the new and "hot" game mechanic is to use cards. Maybe next will be a realization of the fascinating and simple effects made possible by the use of multi-sided die types in a game....
Tuesday, November 22, 2011
Pulse of Battle
Even though I'm working on Follow Me! right now, I'm always circling around Pulse of Battle (Ancient and Medieval ruleset). I thought I'd toss some units on the table and see how it looked.
Keep in mind that this isn't any "real" army - just some Macedonians, Romans, Gauls tossed out in a sort of representative deployment to see if I like the look of the units as composing an army.
 Looks pretty good...nice sense of mass.
 Each 3 x 3 inch stand is a unit. I'm still not sure if I want to do single stand units or 4 stand units. I'm intrigued by what James Roach (Olicanalad) is experimenting with for his Italian Wars collection. Single stand units offer some advantages - fewer figures required to give a sence of mass, ease of movement, diorama effect, speed of moves during play. But - you have to mark disorder and losses on the stand or behind/next to the stand. Multiple stands allows removing a stand and replacing with a loss marker, jumbling the stands for disorder. I'm wondering if multiple base units might better represent the look and feel of a messy battlefield?


So - having seen a single stand per unit "army" - any preferences/observations/comments about single vs. multiple stand units?
Keep in mind that this isn't any "real" army - just some Macedonians, Romans, Gauls tossed out in a sort of representative deployment to see if I like the look of the units as composing an army.


So - having seen a single stand per unit "army" - any preferences/observations/comments about single vs. multiple stand units?
Sunday, November 20, 2011
FoBWW2: Follow Me! Game Last Night
We (Greg C., Greg R. as Germans; Terry and Tony as Russians/Soviets) played another devlopmental game of Follow Me! last night. Tony generated the scenario - a Russian force of around a company and a half, with 2 T34/85's arriving late defending a fairly open terrain - Class I hills, a couple of town areas. A tough place to make a stand....
The Germans had around 2 to 2 1/2 companies of infantry, including a PanzerGrenadier platoon mounted in halftracks, 2 Panthers, and 2 Stugs.
The Germans focused the armor and PzGrenadiers on their right flank, planning to loop through a wooded area and collapse the Soviet left flank. This worked, with some losses on the open hill top. In the end, the German force was too much for the Soviets, and the Soviet morale failed and they withdrew to fight another day.
Some game photos:
 Captain Toby stands mesmerized and focused on a box of cookies brought by Greg C.
 Soviet command staff (Tony, left; Terry, right) discuss the smoke in front of their forces outside the town, while noting the German assault force (right corner of the photo).
 German assault force musters out of line of sight from the Soviet scum in the town.
 Soviets on a hill. They would soon vacate the hill as it was saturated with artillery and mortar fire.
 Assault over the hill and onto the Soviet left flank.
 Single platoon of Soviet scouts facing the German assault force.
 Germans mopping up the Soviet force.
 Captain Toby remains at his post, attempting to use a combination of Jack Russell/Jedi Knight mind control to will the cookies to move over to him.
All in all, I'm very happy with where the rules are. A few tweaks here and there, and I think they are pretty close to done.
The Germans had around 2 to 2 1/2 companies of infantry, including a PanzerGrenadier platoon mounted in halftracks, 2 Panthers, and 2 Stugs.
The Germans focused the armor and PzGrenadiers on their right flank, planning to loop through a wooded area and collapse the Soviet left flank. This worked, with some losses on the open hill top. In the end, the German force was too much for the Soviets, and the Soviet morale failed and they withdrew to fight another day.
Some game photos:


All in all, I'm very happy with where the rules are. A few tweaks here and there, and I think they are pretty close to done.
Sunday, November 13, 2011
Finished Russians, er, Soviets, er Reds....
Whatever they should "officially" be called, here are a few shots of the infantry previously discussed being painted with a change in style.


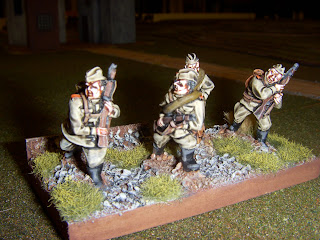


All in all, I'm very happy with the figures and the effect of the style. It certainly is quicker than black prime and 3+ shades/highlights, and at 3 foot away on the table, the styles are indistinguishable.
Up next - getting the table ready for the next game of WW2: Field of Battle "Follow Me!", the squad game in development. This will pit attacking Germans vs. Tony's newly finished Russians. Can't wait!
Wednesday, November 9, 2011
Painting WW2 Russians
I've started using a different technique to paint WW1/WW2 era figures. I use black primer on almost everything, and use multiple highlight shades. But - that seems lost to a large degree on figures that are khaki, drab, gray green, etc. So, I took a page from the Army Painter method and modified it somewhat. I'm sure there's nothing terribly unique in my method, but here it is.
 First - spray prime with a light shade of the finished basic uniform. In this case I used Rustoleum Soft Wheat from the American Accents series.
 Next - block in basic colors for skin, equipment, straps/belting, etc. I also add a highlight color to the basic uniform. They look pretty ugly now. OK - very ugly now. I have to admit, that painting in this style doesn't reward you with good looking troops until they are completed, but in a way that helps drive me quicker to get them done so they look good!

 Then, the key to the quick style is applied - a wash of Future and black ink. I use a pretty strong mix - 5 drops of Liquitex ink to a small amount of Future. How much future? If you have plastic dixie cups - as in the photos - the Future comes up to about the seam showing on the bottom of the cups. This shades the figures, adding depth and dimension. Still shiny, unfinished, and ugly.
 I kill the gloss with DullCote, then go back over the figures. Drybrush lightly with a lighter uniform shade - in this case the same highlight that I applied after priming - Apple Barrel Antique White. This takes out some of the darkness of the figures, highlights equipment and straps, and generally brings the figure together. I then go over the figures with some additional highlights - highlight the straps, paint the weapon barrels, highlight the boots, ink line the straps, etc. The next step is to base - and they're now on their stands drying. More photos of that stage to come later.
All in all, I paint 8 figures in about 2 hours with this method. If I did the black prime/3 tone highlights, it would take me 6 hours to do 8 figures. I think the final effect works well for WW1 and later figures, where I "expect" to see a more grubby figure than a horse and musket figure.


Then apply clear gloss - brush or spray. In this case I brushed on Future.


All in all, I paint 8 figures in about 2 hours with this method. If I did the black prime/3 tone highlights, it would take me 6 hours to do 8 figures. I think the final effect works well for WW1 and later figures, where I "expect" to see a more grubby figure than a horse and musket figure.
Subscribe to:
Posts (Atom)